NSF released some great footage of the collapse of the 900 ton instrument platform of the Arecibo radio observatory. Of course it’s really sad, but it’s also a fascinating study in engineering, failure, and the costs of poor design and maintenance.
Looking at the paint peeling off the cables at the 1 minute mark makes me want to go add more primer to the fascia of my roof.
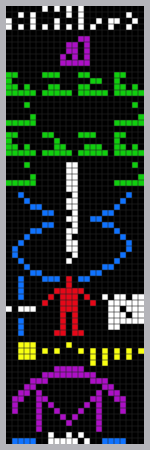
When I think of Arecibo, I remember reading in my astronomy textbook (long ago, before Wikipedia) about the bitmap we sent to the star cluster in Hercules (M13). Transmitted in 1974, it’s about .2% of the way to its destination, by my figuring.
I like observing and capturing images of deep sky objects, but I also enjoy the hunt—just finding really dim objects has its own thrill. I don’t like “Goto” mounts that noisily slew to the perfect spot the computer tells them. I prefer the freedom to move the scope by hand, rapidly and quietly, if not terribly accurately.
But I would like a little more precision in the hunt, especially when it comes to my declination setting circle. As with other equatorial mount scopes, the fork mounted C8 has two tic-marked “setting” circles for coordinates, Right Ascension (RA) and Declination, that are similar to longitude and latitude.
RA Setting Circle
The resolution of my Right Ascension Setting Circle isn’t bad. At twelve tic marks for everyhour, it has only 288 markings, but there’s a good deal of space between the markings making it effectively twice that.
On my declination circle, there are 360 tic marks but they’re squeezed close together on a small disk. At night, with aging eyes, my accuracy in reading is at least off by a degree or two, where objects can be easily out of the field of my eyepiece or camera.
Therefore I try to avoid using the setting circles. My usual trick with the camera attached is to focus on a brightish star on the same RA or declination as my dim object, and slew on a single axis until I’m in the right vicinity of the dim object by using the finder scope. This doesn’t work well for some objects, and I need to use the setting circles instead.
So I spent a week thinking about options for improving my declination precision.
Option #1: Get digital setting circles and install. Pro: Not terribly expensive. Con: Not terribly cheap. That investment might be better spent toward a new mount that has a lot less error than my current clock drive.
Option #2: Get a new mount. Pros: There are some fine mounts out there in the $800 range with great features such as polar finders and low-error drives (even drives you can program the error out of). This is nice, but all the ones I could find either had Goto (noisy, hunt-free) mounts or analog setting circles. I’d like to get a nice mount at some point, but I need to really nail down my requirements and find the right one.
Option #3: Print out a really big setting circle and attach it over the existing circle. Pros: cheap and easy. Cons: ugly, in the way, and I couldn’t even find a printable circle with better than 1 degree precision. But while seriously considering this I had an idea…
Option #4: It struck me that there must be some sort of digital protractor out there. It turns out these are called “digital angle finders,” and they are relatively inexpensive.
A trip to Ace Hardware and $23 later, I had a General Digital Sliding T-Bevel with .05 degree precision. It had a power button and a zero button, and was easy to strip it down to the core. Best of all, it had a center hole in the housing that was the perfect size to tap 10-32 screw threads through—the size and pitch of the center screw that holds the declination circle to the bearing on the scope.
So here it is, my DIY Celestron C8 declination digital setting circle in action:


![Digital_Sliding_TBevel_828[1]](https://scottsky.wordpress.com/wp-content/uploads/2020/08/70532-digital_sliding_tbevel_8281.jpg)
